Image Map

Giveaway

Re-Launch Coming Soon
Showing posts with label Tutorial. Show all posts

Friday, 3 July 2015

Tutorial | How To Make Your Nails Stronger


How to Make Your Nails Stronger

Over the years I've always struggled with my nails because they are so fragile. It seems as soon as I got them to a length I was happy with one would break and it would start a domino affect. Before I knew it they had all broken and I was back to square one which gets very frustrating! At times my nails are so fragile they are also pretty bendy which means they are even more likely to snag and break so this year I decided enough was enough and I'd try some new ways to make them stronger and healthier. They are by no means the perfect nails but there is definitely an improvement so I thought I would share my tips with you in case any one else has been struggling with weak nails like I have!

1) Hard as Nails - I use Sally Hansen Hard as Nails weekly which has definitely helped strengthen them. I apply 1-2 coats depending on whether I am going to apply other nail polish over the top. Make sure you apply it all over your nail, including the edges and let it dry properly between coats.

2) Don't pick your nail varnish - I have a bad habit of picking my nail varnish when I am stressed and I've come to the conclusion it is making my nails weaker because I'm pretty sure it often takes off some of the nail too. This is definitely a no no when it comes to getting healthier nails!

3) Don't pick your nails - If you want strong and long nails don't pick them! It's not something I do but it's an important one to note because it will weaken your nails and make them look uneven.

4) Weekly manicures - I do a weekly manicure which at first started off to be a bit of a chore but after seeing the results week on week I actually began to look forward to it. Included in my mani I remove my nail polish, buff, file and clip my nails, reapply hard of nails and my nail polish.. done!

5) File your nails - I mention filing my nails above but I think it has really helped. My nails look so much better having a defined shape and the more you do it the easier it is. Remember to only file your nails in one direction and have one in your bag to file any snagged nails that occur while your out.

6) Apply nail polish - This is a controversial one as some people say that nail polish makes their nails break more but for me it's the opposite. I found whenever I had chips that's exactly where my nails break so now I always make sure my nails are completely covered in polish. If I get a chip during the day I make sure I touch it up or reapply the varnish to the whole nail as soon as I can and it's definitely prevented getting breaks!

Following the above has made my nails look and feel far healthier and stronger. I'm by no means an expert but these are things I've have done and what has helped me! 


What are your tips for stronger, healthier nails?

Check out these great blogs by my lovely advertisers:

Pink Champagne: Beky Lou
Pink Pearl:, Scottish Stef's Nails,

To advertise with Kimberley's Beauty Blog find out more info here

Monday, 16 June 2014

Tutorial | Tips for Burning Candles


Candle Care


I love burning candles because they create a good atmosphere in a room, are relaxing to watch and can fill an entire house with a beautiful fragrance. When I first starting burning them I pretty much just lit them and left them to it but some of you may be suprised to hear there are actually some steps you can take to make sure your candles burn better and last longer.... here they are:

Pre-Care

When you first burn your candle you need to make sure you have a couple of hours spare to allow the top layer of wax to pool right to the edge of the glass. This is because candles have a memory so if you are patient and do this step it means you candle will continue to burn evenly and you won't end up with an uneven surface that is often described as 'tunnelling'.  If you do end up with an uneven surface there are a couple of things you can do though.

1. You can create a lid for your candle using foil which will help contain the heat and encourage the wax to burn more evenly. Leave a hole in the top to let the smoke come out, though.

2. The less common method (which I discovered myself so it may not be correct) is to gently push the sides of the wax down with a spoon or scrape them so they will fall into the melted wax. You need to be careful it doesn't swamp the wick as it will affect the burning but I prefer this method because it's quicker and it doesn't ruin the look of the candle like foil can.

You also need to make sure you don't burn your candle near any flammable objects or near a draft because this can cause the candle to smoke so a black soot will gather around the top of the jar.

After-Care

Once you have burnt your candle the first time there are a few more steps to take to ensure it lasts as long as possible.

1. Trim the Wick - After the first burn the wick on your candle should only be half a centimetre so make sure you trim it before the next burn as you want to do this when it is cold.

2. Lid - If your candle comes with a lid make sure you always put it in place between uses as this will help prevent the fragrance from fading but more importantly stop dust and dirt from gathering on the surface of the candle.

3. Storage - To keep your candles in the best condition store them in a cool dark place away from sunlight.

4. Reusing Jars - I often re-use the jars from my candles either to store things like makeup brushes or to make my own candles. Before doing the former, you need to make sure all of the wax is removed from the jar which can be easier said than done. You can either do this by running it under warm water and using washing up liquid to remove the wax or freezing the jar to allow the wax to shrink, making it easier to remove. Both techniques take a little patience but it's worth it.

Do you have any other tips for burning candles?
Check out these great blogs by my lovely advertisers:


To advertise with Kimberley's Beauty Blog find out more info here

Thursday, 8 May 2014

Tutorial | How I Clean My Makeup Brushes


Tutorial | How I Clean My Make-up Brushes Tutorial | How I Clean My Make-up Brushes

I’ve mentioned the importance of cleaning your make up brushes before and I’m sure this won’t be the last time because it is something that I feel strongly about.  I know it’s a chore and if you are lucky enough to have lots of brushes it can be time consuming but the build up of bacteria on your tools is really bad for your skin and product build up can also mean the application of your make-up is affected.  Therefore not only are you improving the hygiene of your skin but also the way your makeup looks.

Below is a simple step by step guide detailing how I clean my makeup brushes.  I tend to do this deep clean once a week but even this isn’t really often enough. There are a whole host of ways to clean your brushes and I'm not saying this is the best way, it's just how I do it.

What you will need?

1)      Brushes
2)      Warm Water
3)      Pot or mug
4)      Baby shampoo


What do you do?

1)  Gather all the brushes you want to clean
2)  Put a little warm water and baby shampoo into a tub (a shallow one is best so you can press the brush on the bottom)
3) Swirl your brush around in the water being careful not to get the metal wet as this can make the glue melt resulting in the bristles of your brush falling out.. not good
4) Put a little baby shampoo on your hand and gently rub the brush against it.  You will soon see the product coming off on your hand.
5) Rinse your brush under the tap
6) Repeat steps 3-5 until your brush is clean.  You may need to replace the water in your pot a couple of times too.


To dry your brushes always keep them on their side and ideally resting on a towel.  The length of drying time depends on the size of your brush, if it’s natural or synthetic and the cleaning material you use.  Baby shampoo works well to clean your brushes, smells nice and leaves your brushes feeling soft but you will find your brushes take a lot longer to dry than if you use a brush cleaner such as the one by MAC.  Despite this, I do prefer to use baby shampoo as it works out so much cheaper and I usually wash my brushes in the evening so it doesn’t make a difference to me, they are always dry by morning.

How do you dry your brushes? What product/s do you use?
Check out these great blogs by my lovely advertisers:


To advertise with Kimberley's Beauty Blog find out more info here

Tuesday, 29 April 2014

Tutorial | How to Create a Simple Bun Hairstyle


Tutorial: Bun Hairstyle Tutorial: Bun Hairstyle Tutorial: Bun Hairstyle Tutorial: Bun Hairstyle

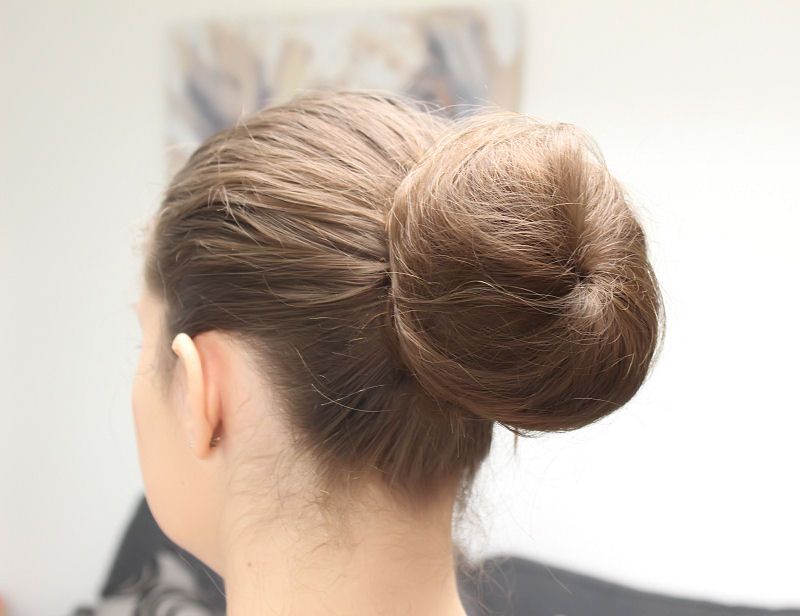
Hello Everyone! Today's blog post is all about a simple everyday hair style you can re-create with minimal effort in only five-ten minutes.  It's perfect to wear during Spring and Summer when you want to keep your hair up out of your face and neck and looks great both during the day softened by pulling out some small strands of hair or in the evening blinged up to make it look a little more fancy. It's one of those hairstyles which is really versatile so whether you want to achieve a quick messy look or neatly finished you can!

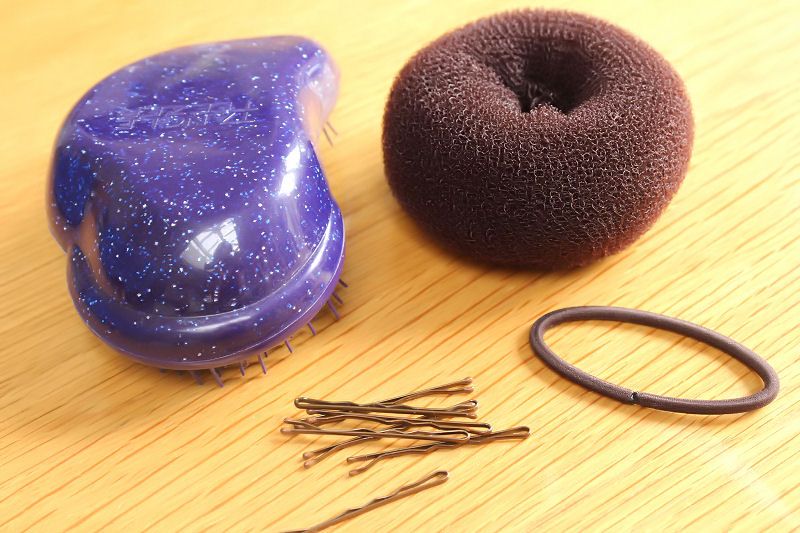
What You Need:

- A brush
- Bobby Pins
- 1 Hair band
- 1 Bun Ring
- Hairspray

The Steps:

1) Brush your hair to remove any tangles
2) Scoop your hair into a pony tail and tie with the thin hair band. You can make it as tight or lose as you like and also experiment with where you want your bun. You don't have to have it up high like I have, it looks very pretty down low to the side too.
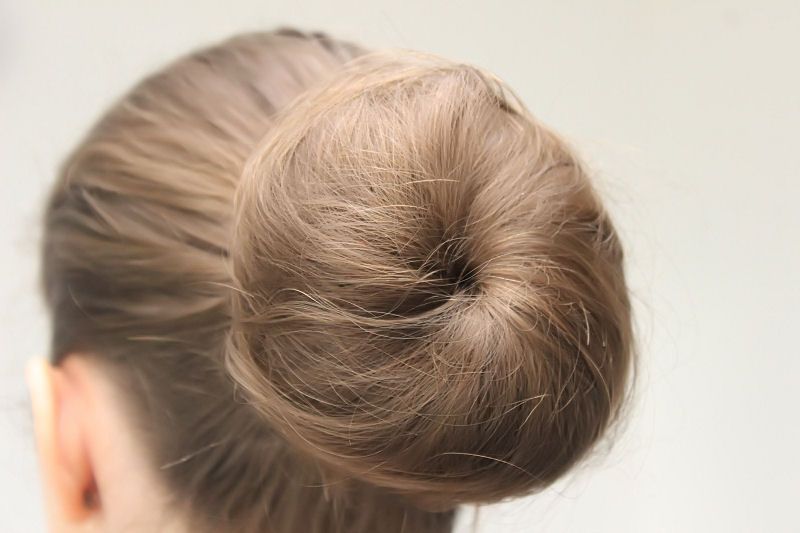
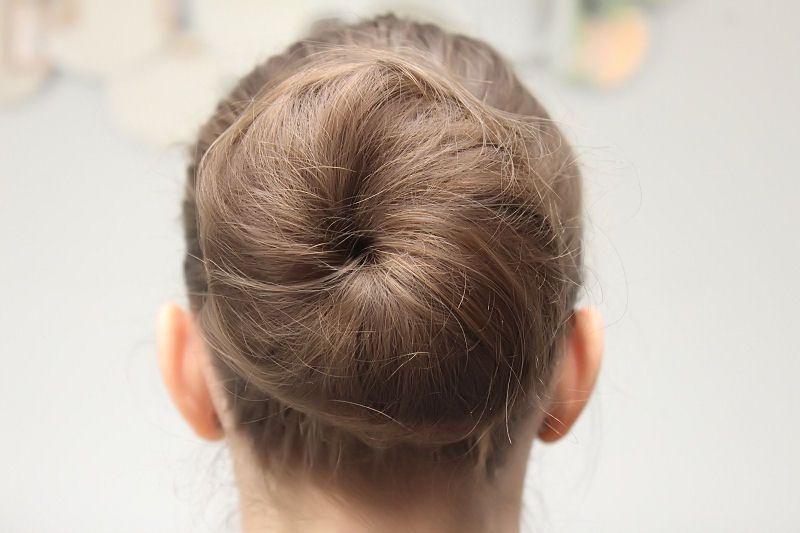
3) Put your pony tail through the bun ring so it is sitting at the base.  Grab your pony tail and fan it out a little before wrapping it over the edge of the bun ring to the other side and then wrapping it around. Make sure you cover all of the bun ring. This gets easier with practice.
4) Tuck the end of your hair under the bun ring and clip in place using the bobby pins. You can use as many as you like depending on how secure you need it to be. I usually use up to ten. To finish spray all over with hair spray.

Tips:

1) This works best one 1 day old hair as the grips stay in better
2) The bigger your pony tail the messier the effect and the easier it is to cover the bun ring so maybe think about using extensions, back combing your hair or using textured hair rather than straight.

What do you think of this hair style and tutorial?
Check out these great blogs by my lovely advertisers:

To advertise with Kimberley's Beauty Blog find out more info here

Monday, 19 August 2013

Tutorial and Review: Add Bling to your shoes using Stickcons


Hello Lovelies,

Today I have both a review and tutorial post for you so it is very picture heavy but I hope you enjoy it! One of the latest fashion trends is to add 'bling' to items whether it be phones, bags or shoes.  Today I will be looking at an affordable and fun way to do this at home using Stickcons.

My first impression of Stickcons was how pretty the stones look and how gorgeous the colours are.  I have silver, red and blue stones which are all stunning and showed off to the full by the simple, bright packaging. Other colours are also available on the Stickcons website which has a gallery showing the different colours available (including multi-coloured, black, red, blue, silver, yellow, green and lilac).  At first glance it isn't obvious that these stones are in fact strips (it says it on the packaging but I was so busy admiring the stones I missed it) which means the process of adding them is stress free.  Here is a little more information about Stickcons before the tutorial:
  • Stickcons™ strips are DIY self adhesive sticker strips that transform & bling up the rubber parts of Converse sneakers.
  • Stickcons™ kits have a secret glue formula which makes them durable, flexible and removable on rubber.
  • Stickcons™ are designed to fit any size, just stick them on and just pull to snap off any excess –meaning no need for a scissors.
  • Stickcons™ are available in 10 colours to match your mood or your outfit.
  • Stickcons™ are the affordable alternative to the ever popular trend of customised sneakers


Tutorial: The steps:

  1. Gently pull the strips of diamante off the cardboard backing, starting with the largest semi circle.
  2. Push each gem down and move the flexible strip into position as you go, this way all your stones are lined up correctly.  It's good if you can find a guide on your shoe for example the bottom of a line.
  3. Once you have finished a line, gently pull the end of the strip, whilst holding the gems that are already stuck down and they will tear off leaving you with a perfect finish to you line.
  4. Complete steps 1 and 2 but this time use the next semi circle for the toe section of your shoe, followed by the three straight strips.
  5. Once the toe area on your shoes is complete you need to start on the sides.  It doesn't matter what order you do this in but I found it easiest to start with the middle section, followed by the top and lastly the bottom.  You stick these stones on in exactly  the same way.
  6. Finally, push down on all the stones one last time to make sure they are all securely in place.


Before you know it, your boring, average shoes have been jazzed up into a unique pair of footwear.  I really can't stress enough how much fun I had creating this look and how easy it is.  It doesn't take long to do and is the perfect creative task for both adults and children alike! If you wanted to you could even cut the strips to separate the individual stones to create a different look or use these gems on other things. I haven't found the staying power of the stones an issue (I've only worn them out twice so far) but if you are concerned, you could add a little glue to the back of the strips to improve their staying power even more.

Using Stickcons stones are a really great affordable alternative to the expensive 'instonisation' trend and are available in the retail store Schuh for €11.

I am thinking about filming a video tutorial using Stickcons.  Please let me know if it is something you would like to see :)

What do you think of Stickcons? Will you try them?

*Stickcons kindly sent me this product to review


| Twitter || Instagram || Blog Lovin' ||  You Tube |

 
Check out my August advertiser Lovely Jubbly Blog

To advertise with Kimberley's Beauty Blog find out more info here.

Saturday, 17 August 2013

Tutorial: DIY Facemasks

Hello Lovelies,

Today I have my first ever guest post which is from the lovely people at Eco Market.  They will tell you a little about some fab DIY face masks that are quick and easy to make and use at home.


1) Treating Dry Skin: Avocado, Coconut Oil & Honey

Avocado oil is a remarkably effective emmolient for the skin, and has been put
forward for patenting as a treatment for some forms of dermatitis. Combined
with coconut oil, a traditional heavy-duty, non-greasy moisturizer, and honey's
anti-oxidant, anti-microbrial properties, and you have something your skin will
go nuts over. Try:

 - Half a ripe avocado
 - 2 tablespoons of honey
 - Half a tablespoon of coconut oil

Mash/puree the avocado until it's smooth and spreadable, blend with the
other ingredients, apply to your face and leave for at least 15 minutes.


2) Treating Acne: Strawberry

Salicylic acid is used to tackle skin flare-ups, from psoriasis to acne. You'll
find it in a lot of anti-acne medication. You know what else has salicylic acne
in it? OK, yes, you do - the picture gave it away. Enough with the failed
suspense and on with the recipe!

- one-quarter of a cup of strawberries
- one-quarter of a cup of sour cream or non-flavoured yoghurt

Bring both to room temperature, blend until creamy, and apply!


3) Cleaning & Firming: Mud!

No need for a recipe here - our Eco Market vendors have done the work for
you. Check out the wide array of clay-based facial masks on offer, including
the BC Glacial Clay Mask from Maple Creek Soapworks, NaturalKiosk's


4) Rejuvinating: Papaya

The wrinkles on your face - sorry, I mean, the wrinkles on someone's face
(not yours) originate from collagen and elasticin fibers. When these fibers
lose their tension, your skin sags. All praise the skin-tightening papaya! Its
unripened pulp contains an enzyme called papain which breaks down these
fibers, helping remove those wrinkles and smoothing the skin. Give it a go!

 - Half a cup unripened papaya, diced
 - 1 teaspoon plain yoghurt
 - 1 teaspoon honey

Blend, smooth onto your face, wait for 8-10 minutes (you should feel a slight
tingling - perfectly normal). Moisturise - and then see how young you feel.


5) Soothing Sunburn: Oats

Oats can do a remarkable array of health-boosting things (hence their
4,000 year history of medical use) - but when it comes to sunburn, all you
need to know is that they're anti-inflammatory, thanks to compounds called
aventhramides. If you're suffering from overexposure to the sun, put your oats
to good use like this:

- One-quarter cup of oats
- One tablespoon of fresh tomato juice
- One tablespoon of aloe vera
- Half a cup of plain yoghurt

Cook the oats for five minutes, cool completely. Mix aloe vera & tomato juice
with yoghurt, and stir that mixture into the cooked oatmeal. You're good to
apply! (Give it 15 minutes before you remove.)

Images: threelayercake, julien haler, Phil Whitehouse, Janine, S Diddy and
Tomáš Obšívač.

Thanks to Inhabitat, About.com, Whole Living and eHow for the recipes.

* This is a guest post by Eco Market


I hope you enjoyed reading the post from Eco Market and found it useful :) Will you be trying any of these face masks? Do you ever make you own and have a recipe you would like to share?


| Twitter ||  Instagram || Blog Lovin' || You Tube |


Check out my August advertiser Lovely Jubbly Blog

To advertise with Kimberley's Beauty Blog find out more info here.

Saturday, 27 July 2013

Tutorial: Wrap around bun

Tutorial to Create a Wrap Around Bun

Hello Lovelies!

Today’s post is a tutorial on how to create a wrap around bun.  I will probably do a video tutorial for this too, if you want it?

This is the perfect summer hair style as it keeps you cool, is neat and tidy and quick and relatively easy to do. It stays in place all day so you don't need to worry about having to touch it up and is suitable for both day and evening wear.  You can add extra accessories to this look too/

Here’s what you need:

1)      A bun ring
2)      Bobby pins
3)      Hair brush
4)      Hairspray
5)      1 thin hair band

Here’s what to do:

1. Brush your hair up into a pony tail and tie it in place using your thin hair band.  Make sure you remove all lumps and bumps as you will not be able to do this later. 
2. Put your bun ring over the pony tail so it is sitting at the base i.e. on top of the hair band
3. Hold onto your pony tail at the base (above the bun ring) and gently pull it so it is wider.
4. Start wrapping your pony tail around the bun ring holding it in place with one hand and wrapping with the other.  Occasionally pull the hair which is on the inside of the bun ring tighter to get a neater finish that covers the entire bun ring.
5. Continue wrapping your hair around the bun until you reach the end.  Once you have, tuck the tips of your hair under the bun ring.
6. At this point you have a perfectly formed bun that looks like it will stay in place but looks can be deceiving.  You now need to insert bobby pins around the base of your hair to make sure you bun will stay in place all day.  I use maybe around ten but use as many as you require… there is not limit.
7. Finally spray your bun with hairspray to help stop any flyway's and get everything in place.  If you want the hair on the head to also be smooth, spray a little hairspray onto your hands and smooth them over your head.  This will keep flyway's at bay whilst still maintaining a soft finish to the hair.

Note: To go for more of a messy version of this style here are some tips:

1)      User your finger tips to pull your hair up into the pony tail instead of a brush
2)      Tie your pony tail as loosely as possible
3)      Don’t be quite as tidy when wrapping your hair around your bun.

What do you think of this look?
 
| Twitter ||  Instagram || Blog Lovin' || You Tube |

Saturday, 27 April 2013

Tutorial // Beachy Waves with NO Heat

I've been wanting to include tutorial type posts on my blog since I started it but it is a little awkward to do them because it's much easier to show someone how to do it than describe it.  However, today's tutorial is so simple it is something that can be captured in a blog post rather than a video so here are the steps I take to get beachy waves with no heat.

First of all, here's a sneak peak of the products I use to get this look (I have omitted shampoo and conditioner):

Beachy Waves Tutorial products

 Moroccan Oil - This product smells A-mazing and I use it to nourish my hair, make it dry quicker and also leave my hair smooth and shiny. Read the review here.
 James Brown Mousse - This is another lovely smelling product and I use it to add volume to my hair.
 Tony and Guy Sea Salt Spray- I use this product to add texture and body to my hair, this is what creates the beachy waves.

So to create natural looking beachy waves I do the following:

1. Wash my hair
2. Leave my hair to dry in a towel for around 15-20 minutes. I do this so it is still very damp but not soaking wet.
3. I use my Tangle Teezer to brush through my hair.
4. Apply two pumps of Moroccan oil onto my hair, concentrating on the tips upwards (but not the roots).  Note, if you have shorter hair then use less of this product.
5. I use around a golf ball size of mousse starting at the roots and working down.  I first do this standing up and after I put my hair upside down and run any excess I have through it. Remember to shake your mousse really well before you use it!
5. I brush my hair through again with my paddle brush or tangle teezer
6. I then generously spray the sea salt spray evenly, all over my hair
7. Finally, I separate my hair into two sections and plait them reasonably tightly, so basically I've got two bunches/pig tail plaits.  It isn't the best of looks but it doesn't look so well with only one plait.

I then just sit and wait for my hair to dry naturally.  When it is almost there and if I'm feeling impatient I will un-plait it and leave it loose so it dries a bit quicker but only when the majority is dry already otherwise you won't get the beachy waves.

Once my hair is dry, I simply brush it through (if it needs it) and apply some more Moroccan oil (only a tiny bit) to define the waves.

This is what I end up with:


What do you think of this look? Do you think you'll try it?

 
| Twitter ||  Instagram || Blog Lovin' || You Tube |

Friday, 29 March 2013

How to Import Blogs to Blog Lovin' from Google Reader


How to Import Blogs to Blog Lovin' from Google Reader

Hello Everyone!

Most people would have heard the rumours by now that GFC and Google Reader are closing down at some point in the near future.

This will mean you will lose all of your lovely followers and also lose all of the brilliant blogs you like to keep up-to-date with and read.

Consequently, I thought a useful post to some people may be how to import all of the blogs on the Google Reader over to Blog Lovin'.  If you haven't used Blog Lovin' before it is really quick and easy to sign up and personally I find it much easier to follow the blogs I love on there rather than using Google Reader anyway.  You can also like and comment on your favourite posts from there which is a nice added extra!

Below is an example of how posts are displayed.  You click on it and then your blog opens.


So to import all of the blogs you read is super easy.  Just follow these steps:

1) Go to www.bloglovin.com and sign up if you haven't already
2) Once you have signed up go to www.bloglovin.com/import
3) Click on 'Google Reader'


4) Click on 'Allow Access'
5) Your blogs will now automatically start to transfer over to your Blog Lovin' account.  This process doesn't take long at all and even tells you how many blogs are being imported.. I think a lot of people have been suprised by the amount the follow!


6) You can see a full list of all of the blogs you follow by clicking on you profile name > following


OR clicking on your profile name > my profile


If you have a smart phone Blog Lovin' has a great free app you can download too so you can view all your favourite blogs whilst on the go!

Did you find this tutorial useful?

| Twitter | | Facebook | | Instagram | | Blog Lovin' | | BaoBella | | She Said Beauty | | You Tube |